Showing posts with label sword. Show all posts

Wednesday, May 29, 2013

Black Gold Saw: Sword

So I realize this post has been a long time in coming (give or take a year or so), but I am finally getting around to the sword construction post for Black Gold Saw!

(pretending that I didn't completely forget about this)


My sword is quite similar to Stuart's - we went to Home Depot and bought a giant piece of that pink 2" thick insulation foam together and got them to cut it in half in the store (meanwhile having to awkwardly explain just why we needed almost six feet of insulation foam when we were clearly not making home repairs).

Unfortunately, Black Gold Saw's sword (what a tongue twister) features an entire edge that is serrated, so I had to measure and sketch out every zig and zag along the way.  
The top bit ended up being nixed and enlarged later
 And then came the fun part.  Carving.  Carving carving carving carving.  Expect to spend many many mind-numbing hours on this part, and be careful - X-Acto knives are sharp.  (You might think this obvious, but when you are trying to distract yourself from the tedium by watching bad television, your hand might accidentally slip).  My poor apartment had more pink insulation foam on the floor than actual carpet by the time I was done with this.

In order to get the hilt to fit snugly into the sword, I cut a rectangular strip down the middle of the sword so that I could insert the PVC pipe.  I remade the top part of the sword out of leftover foam (made it larger), so I just cut a hole through that and stuck the PVC pipe all the way through.
Just so.
Then came the joys of expandable foam, and here comes the warning: DO NOT GET THIS ON YOUR HANDS, CLOTHES, FLOOR, OR ANYTHING THAT YOU ARE REMOTELY ATTACHED TO.  Wear gloves, and then prepare to never be able to use them again.
Terrible quality picture is terrible
And once it is dry (you should leave it at least overnight- poke it with a stick to be sure it is hardened), you can shave off the extra foam.  However, here is something I was not aware of that caused a few problems- when expandable foam is cut, it actually shrinks noticeably in volume.  Do not shave the foam completely flat against the sword - you will end up with this weird warped indentation down the middle of the sword that I have (and was unable to mask).  Once that is done, cover the entire thing in masking tape.
Add paper mache, and voila!
Finally, spray paint/acrylic paint it until it looks the way you want it to, then seal it with Mod Podge (but get matte, not glossy...I accidentally used glossy and my sword was much shinier than it needed to be).

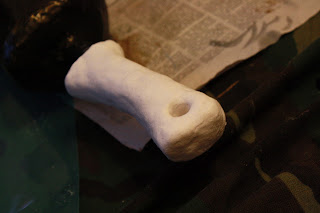
The handle was made with Delight air-dry paperclay , and I sculpted the skull on top with stone clay.  

The finished product:


Stay tuned for another sword tutorial!

~Kathryn

Friday, July 6, 2012

Black Rock Shooter photoshoot with Bryan Regan part1 Insane Black Rock Shooter

Hi guys, no time no post...>.> but today's post is pretty awesome!  I'm here to share with you guys some photos from our Black Rock Shooter photoshoot with Bryan Regan, a local professional photographer who we had a wonderful opportunity to work with.  

Below are photos of me as Insane Black Rock Shooter for Animazement 18.   Remember, you will see a bigger photo if you click on it :D


we took these pictures near the train tracks about 10min away from the Raleigh convention center.  The location was great, but Bryan's lighting skills are even better! 


I'm really happy that this photo shows the blue streak in my hair.  It took me a while to sew them in ^.^


Close up of my face........wahhhhhhhhhhhh =_=;


and here are some outtakes:

my hair and shoulder piece fell off >.>

dude, I'm trying to say something here!

The broken Insane Blade Claw Q_Q
Many many many thanks to Bryan Regan for dealing with our ridiculous personalities!!  Stay tuned for more awesome photos from Bryan of Black Gold Saw and MZMA.  I promise there will also be crazy photos from Katsuya Weller coming soon as well!  :D

Mimi

Wednesday, June 6, 2012

We're back! and MZMA Sword Recap

Hello everybody!  Phew, these past couple of weeks have been super super hectic, but SOOO much fun.  After attending Animazement (cosplaying all three days of the con), and after taking a week long trip to Disney World and Universal Studios, Cosplay-vania is finally back home! :)

During the time that we were preparing for Animazement, we kind of neglected our blog for a while Q_Q.  So I thought I'd go back and show the development of one of my favorite parts of my MZMA cosplay - his sword.

We started with a 5.5' by 2' rectangle of thick pink insulation foam board (found at Home Depot).  The foam was then carved down to make a rough outline of sword (except for the side piece near the hilt).  Once carved, we identified a location to place the hilt (in this case, a long, skinny cardboard tube filled with spray insulation foam), and cut a space long enough so that about 2 ft would stick out of the back of the sword.  The tube was then place inside the sword and surrounded with spray insulation foam for adherence and stability.


When the spray foam cured enough, we carved off the top layer so that it was smooth with the rest of the pink insulation board.  Thankfully, this worked really well to keep the tube steady inside the sword.  Using some extra pink insulation foam board, we cut out a piece that would work for that corner piece near the back of the sword.  It was then secured to the rest of the sword using spray foam.
The completed outline of the sword. 


 The remaining spray foam was carved so that the sword was smooth all over.  We then applied paper-mache to the foam components of the sword, and coated it with Mod Podge.


I wish I had more pictures for this next part, but we were in a time crunch and could not take many pics.  We spray painted the sword red and used black electrical tape to cover the hilt.  Red and black fun foam pieces were used to detail the tip of the sword, and pieces of industrial pipe foam were used to make those large black protrusions near the middle and backside of the sword.  Hot glue was our adhesive of choice :P  As a final detail, we used gold dimensional paint to outline parts of the tip and black dimensional paint to make the holes in the tip.


Because I had to cut many pieces of pipe foam to get the shapes right, the sword came out looking more rugged than polished, which actually worked out alright.  Also, because it was surrounded in pipe foam, the sword was nice and squishy, hehe.  Once we get some more pictures from our photographers, you will be able to see the full sword, and its size compared to my height.  Mimi helped out TREMENDOUSLY in the concept and creating of the sword.  I really couldn't have made this in time without her.

Thanks everyone, and we'll be sure post more often now that we have time and are not on vacation, hahaha. 

~Stuart~

Tuesday, May 15, 2012

Insane Black Rock Shooter cosplay progress part 4: more on the sword

Hi y'all!  I finally finished my Insane Blade Claw! (what a silly name for a sword.)  Anyways, just to recap (you can find part 1 of this tutorial/progress HERE): I used spray foam to make the structure of my sword, and then I carved it.
My plan was to masking tape the whole thing, and then paper mache it with newspaper and the paper pulp thingie.  Well, I kind of changed my mind >.>

The masking tape process was definitely necessary, considering that the spray foam formed a ton of holes on the sword.  (I forgot to take a picture Q_Q)

I also paper mached my sword with newspaper to make the entire thing smoother and less fragile.  I just went to Home Depot and bought a tub of wallpaper paste and dipped strips of newspaper into it.  Then, instead of using paper pulp mache (which I bought...and needs to be returned >.>), I just mod podged the entire sword three times.
Mod Podge is amazing, it makes the small paper creases smooth!  If you are not very picky (like me), you would be happy with the result of this.  Then I sprayed the entire thing black with matte spray paint.
As you can see, it is not very smooth, but it is good enough for the grungy look I'm going for.
Here's another shot, you can't really tell the traces of newspaper anymore.
Then I dabbed some of the gold 3D fabric paint onto my sword to give it a rusted feel (I have other gold acrylic paint, but they were not nearly as pigmented as the fabric paint for some reason).
The paint also made it a little shiner than the matte spray paint. Not what I was going for, but okay~


Then I used "Delight" paperclay and made a hilt for the sword.  I really didn't think this clay was good enough for the hilt at first because 1). it was super expensive for a 3oz package, and 2). it had a sponge-y feel to it that made me think it was not sturdy enough.  However, after letting it dry for a couple of days, the light and squishy feeling actually made the hilt very comfortable to hold.  You can sand this type of clay, but it doesn't sand nearly as well as stoneclay.

After sanding, I wrapped the handle with electric tape and attached my foot-long chain to it!  Voila!

That's all for now~
Mimi

Wednesday, April 18, 2012

Insane Black Rock Shooter progress: part 3 - The Insane Blade Claw

  Now that the anime for BRS has finally come to an end (right?), my character is not just Huke's illustrations anymore!  Huzzah!!! I probably have not indicated this before, but I'm actually doing my costume based off of the figure that comes with the BRS blue-ray disc.

  Anyhow, I have finally made some very small progress with my weapons!  The big one (Insane Cannon Lance) is still the biggest concern for me, but I wanted to at least get started on the smaller one due to it's complexity.  The sword itself is called the Insane Blade Claw (why are the names for things in BRS so stupid sounding?), it is basically an upgrade from the Black Blade used by BRS.

  My inspiration for making this weapon comes from Kamui Cosplay, who is known for her awesome weapons and armors made out of foam or/and wonderflex.  I decided to use expandable foam for this sword because of it's "organic" shape.  So, below is my current progress:
1. I got some foam boards (the ones you use for science projects) from the scrap exchange for about 25 cents each (if not less), and free handed the sword onto the board.  I kind of trust my free hand ability (even though I know it's not perfect), but if you don't (or you are a perfectionist), then do it with a projector, or print out large patterns in pieces and then glue them together.  Then I cut the sword out with an X-acto knife.

2. Here is where I made my first large mistake.  I forgot about the stick that I have to insert into the middle of the sword.... yeah, but you will see I fixed that later.  Anyways, I sprayed "Great Stuff" foam (from Home Depot for $3.99) onto my foam board pattern.  This was rather amusing because the foam came out like whipped cream.  Although on the can it said that the foam will cure in 8 hours, this is complete bull-shit.  Perhaps it's due to the thickness I sprayed, it took about 14 hours if not more for the foam to completely cure.  Also, according to the guy that works at Home Depot, air is what cures the foam, so if you spray this stuff into a bag that is not airy, the foam will become liquid.


3. After about two or three hours (I went to dance and came back), the top part of the foam was already stiff, so I just turned the whole thing over.  Of course, this is when I realized, "SHIT, I forgot to stick a handle in there."  Luckily, I only had one side sprayed.  I took a sharp utility knife and dug a long hole onto the exposed foam board, this is when I realized that nothing inside was dry, and once you get that stuff on your hand, it is very hard to get off.  I sprayed some more foam into the middle of the sword, and placed a pvc pipe (from Stuart's Stein cosplay) into the middle of the sword (of course, the pipe had to be supported with a box or something).  Then, I sprayed foam onto the other side.  "PHEW"


4. Once the foam was completely cured (aka Next Day).  I took out my utility knife and just carved the sword out.  This sounds easy, but it was rather difficult.  Just be patient and take your time.  Do it at a place that you don't mind getting dirty, and don't wear anything that the foam will stick to (such as nylon stockings Q___Q).  When you are happy with what you have, you should just put the knife down.  I tried several different types of knives because I didn't like how short the blade on the utility knife was.  However, nothing worked better than the utility knife.  Saws are nice and long, but they created very uneven surfaces and sent tons of little foam particles flying everywhere.  I had a set of wood carving tools that I wanted to use for the details, but it didn't work really well.

That's all for now, I'm planning on masking tape the whole thing, then paper mache it with newspaper.  I'm still debating on whether to do the pulp paper mache on top of it or not, I like the idea of paperclay better, but of course it is a lot more costly >.<.

- Mimi
Related Posts Plugin for WordPress, Blogger...