Friday, June 29, 2012

MZMA Cosplay - Wig

Yo people!

So today I'm going to post some pics of how we styled the wig for MZMA (and by we I mean Mimi).  Now I know that Gachapin's modeling images are still well within your memory, but for reference here he is modeling the CosplayWigsUSA wig we purchased.


...and here it is sitting on m head, uncut and unstyled.


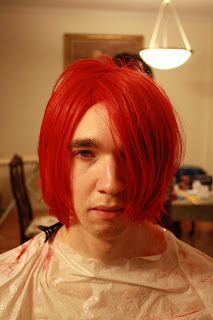
And now the cuts!   Mimi did an awesome job shaping MZMA's wig to what it should look like.  Much was taken off of the front and back.

 And after feathering the wig and giving it some volume, here's what it looked like (notice the little tuft of hair in the back):

[Just as a side note, if you wear a plastic garbage bag on your body while you get your hair/wig cut and styled, you will desperately need to shower afterwards (SOOOO SWEATY XD).]


I think wig turned out awesomely accurate!  The black spinal headpiece was attached with three wig clips.  The wig clips worked well for keeping the headpiece in place, but in practice, only about one was needed.

Thanks to Mimi for all of her hair-cutting expertise and patience!
We'll be back to post more cosplay pics soon, and hopefully we can show you some of our completed costumes :D

THANKS!

-Stuart-

Monday, June 11, 2012

Insane Black Rock Shooter cosplay part 5: the breast plate tutorial

Hi guys!  Now that I have caught a mild cold from Stuart, I finally have some time to sit down and make another IBRS progress report (kinda late lol).  I think this would be useful for whoever is trying to make light-weight armors.

First, let's recap.  I have already shown you the fun foam pieces I made out of a modified shirt pattern I had:

in order to make them with a little bit of depth to look like the armor IBRS is wearing, I had to add more layers of foam.
This gives you an idea of how thick the breast plate is
Comparatively speaking, the armor I made was not nearly as thick as the figure's.  Next time, I would probably use something like a thick yoga mat to make the armors.

The foam I found in Scrap Exchange that I used for the middle section to add thickness to the armor.  I cut it according to the pattern I already made.

Hot glue the thicker foam onto the already existing fun foam layer

add tape to get rid of bumpy areas and glue another layer of fun foam on top of the grey foam.

This is what the back looked like, I used some masking tape to hold the layers while the glue was drying.  I have not found anything better than hot glue yet to stick foam together.

Smoothing out the gaps by filling it with hot glue and scrape the surface with a piece of card

details on the filled gap

then mod podge the surface to prep it for contact paper

I also taped the edges with black electric tape to hide the grey foam.  I think model magic would work as well and make less creases, but I didn't have any at that moment.

with the contact paper glued on.  Contact paper sticks really well to craft foam once you mod podge it.  However, it becomes extremely unforgiving with mistakes.  Make sure you have a card ready to squeeze out those bubbles.

pieces of the back armor, I made this a little thinner because it would bend more easily for a better fit that way.

mod podge

with electric tape and contact paper.

The basic breast plate is finished.
The sides are held together with elastic and Velcro.  Do buy the industrial grade Velcro, because the regular ones just won't be sticky enough to hold the armors together.

After few adjustments, I added more details to the breast plate and voila!  Oh also, since craft foam can kind of hold a shape after it is been heated, I recommend heating it and bending it before you apply mod podge and contact paper.  They will become rather...burnt.
This displays all of the armor pieces I made for the cosplay.  I did acquire some thicker craft foam from Michael's later on that I used for some of the leg armors.  Other than that, the shoulder piece and some of the arm pieces are all thickened with the method described above.  I wanted to show you guys the details for my other armor pieces, however, I was too busy to take photos and this is the only one I have now.  Q_Q

Anyhow, let me know if you have any questions!!!

btw, I'm doing this Otaku House contest right now for this costume, please vote for me!!!  Thank you!

- Mimi -

Insane Black Rock Shooter Cosplay Progress:
Part 1 | Part 2 | Part 3 | Part 4

Saturday, June 9, 2012

Post-con Posts! Black Gold Saw - Jacket


If you couldn't tell by the sudden deluge of updates, we're baaaaack and ready to finish up our cosplay tutorials from this con.  Or, in my case, to sarcasm at you some more.

And here I was thinking that the half jacket was going to be the hardest part of the costume.  Ha.  Ha ha.  Ha.  If only.
To begin, I started looking around for the right kind of fabric, and I ended up with a type of black pleather that I found on sale at Jo-Ann Fabrics.  I tried to avoid very stretchy fabrics that would probably wreak havoc on any sewing machine (more on that later, I'm afraid).  After digging around in the pattern section, I came up with a cropped jacket that was close to what I was looking for and was relatively simple to make, an important feature for someone as sewing-machine challenged as I seem to be.

 It looks so pink and happy, doesn't it?  Won't look that way for long, I'm afraid.
Minor alterations were made to the collar and front, but most of the changes were made to the length of the sleeves in order to make them come past my knuckles.  Also, sewing on sleeves makes me want to throw things.

Look ma, no sleeves!  
 I was surprised at how (relatively) well the fabric got along with the sewing machine, but alas - it was not meant to be.  At the end of the project (i.e. the ends of the sleeves), the machine decided that enough pleather was enough, a decision heralded by a sound that (I can only imagine) was akin to that of a cat being thrown backwards into a wood chipper.  (...What is wrong with my brain, that that is the first mental image I come up with.) So, the rest was done by hand.  

The white stripes on the upper sleeves and collar were painted, and the stars were made as stickers from a pattern I drew.  As I discovered, drawing perfect stars is not as easy as it sounds.  Not that that sounds particularly easy to begin with.  The collar was held together at my throat by two hook and eye fasteners.

Stars and stripes!  How patriotic.
A word to the wise, though: Experience dictates that, in temperatures upwards of 90° F, pleather and any pleather-like materials tend to...melt.  Spending prolonged amounts of time outside in the summer in the name of awesome photoshoots may lead to said melting.  And pleather is not the most comfortable (or breathable) of materials to begin with.  But it must be said, the jacket (unlike some other parts of my costume cough belt buckle cough) survived the entire convention, and that is all I asked of it.  Overall success!  

More on horns, contacts, and photoshoot pics to come!

~Kathryn

Thursday, June 7, 2012

Murumuru cosplay - the final touch! (a small wig tutorial)

Murumuru's costume was super easy to make...until I started to work on the wig, which was a disaster.  My original plan was to attach the two LONG ponytails I purchased from Arda wigs to my Eruka wig.  Let's just say that it didn't work out very well, the Eruka wig had to be preserved for the second appearance of my Eruka cosplay and it was way too thin to work with.  So I had to purchase another wig last minute from cosplay.com (due to the fact that Arda was closed Q_Q).  

The wig took way too long to arrive.  It got shipped out after I made a paypal dispute with cosplay.com.  So, don't buy from them.  


Here's the wig untouched.  It was a lot darker than the "silver" ponytails from Arda.  The quality of the wig was pretty good, except that they stitched up the eyelets in the back where you could adjust the size of your wig.  tsk tsk

Murumuru has this weird bang thing going on where it lifts up and makes a little pocket thingie (this is hard to explain Q_Q) kind of like Sephiroth's hair.  It took me ages to find a tutorial on how to make this happen, but I did find a Japanese tutorial HERE.  It uses a frozen glass bottles to form heated fibers.  Aslo..apparently this type of hair is called the middle M letter (途中M字).

so I took some hair, heated it up with my hair dryer and then rolled it down with a frozen glass tube I found. Then I teased the down side of the section and brushed the top smooth.  Hair spray was then applied to keep the shape of the "M".

Done with both sides.

I have to say, I thought my job was done after this since the ponytails were clip-on.  I was totally WRONG. There was no way on earth those heavy clip on ponytails were going to stay on that wig.  Especially when I have to make outer decorations for them. 

taken from THIS POST on cosplay.com
Now, the image above is where I got my inspiration to make my ponytails.  However, instead caulk, I used hot glue.  I know that some of you are probably frowning at this point, but I was in such a time crunch that I had to use whatever dried the fastest.  I made two little stubs on the wig and hotglued them to harden.  Then, I took the clips off of my ponytails and carved two pieces of pink insulation foams to fit/hotglue into the ponytails.  Last but not least, copious amount of hot glue were applied to the foam and the stub to hold both together.  You have to be VERY patient and hold the ponytails up until all of the hotglue is dried.  The drying process took about 10min.

After attaching the ponytails, you will notice that your wig has gotten so heavy that it is impossible to put on. Do not worry!  Just sew some wig clips in the front and you are good to go!  It will just hurt a little bit because your hair line will get pulled back really tightly.

Photo courtesy of  David Song
Photo by Stuart
and Voila!  My entire costume :D  More photos will come since Katsuya Weller is awesome and has posted some preview shots of our Mirai Nikki photoshoot already! 

Wednesday, June 6, 2012

We're back! and MZMA Sword Recap

Hello everybody!  Phew, these past couple of weeks have been super super hectic, but SOOO much fun.  After attending Animazement (cosplaying all three days of the con), and after taking a week long trip to Disney World and Universal Studios, Cosplay-vania is finally back home! :)

During the time that we were preparing for Animazement, we kind of neglected our blog for a while Q_Q.  So I thought I'd go back and show the development of one of my favorite parts of my MZMA cosplay - his sword.

We started with a 5.5' by 2' rectangle of thick pink insulation foam board (found at Home Depot).  The foam was then carved down to make a rough outline of sword (except for the side piece near the hilt).  Once carved, we identified a location to place the hilt (in this case, a long, skinny cardboard tube filled with spray insulation foam), and cut a space long enough so that about 2 ft would stick out of the back of the sword.  The tube was then place inside the sword and surrounded with spray insulation foam for adherence and stability.


When the spray foam cured enough, we carved off the top layer so that it was smooth with the rest of the pink insulation board.  Thankfully, this worked really well to keep the tube steady inside the sword.  Using some extra pink insulation foam board, we cut out a piece that would work for that corner piece near the back of the sword.  It was then secured to the rest of the sword using spray foam.
The completed outline of the sword. 


 The remaining spray foam was carved so that the sword was smooth all over.  We then applied paper-mache to the foam components of the sword, and coated it with Mod Podge.


I wish I had more pictures for this next part, but we were in a time crunch and could not take many pics.  We spray painted the sword red and used black electrical tape to cover the hilt.  Red and black fun foam pieces were used to detail the tip of the sword, and pieces of industrial pipe foam were used to make those large black protrusions near the middle and backside of the sword.  Hot glue was our adhesive of choice :P  As a final detail, we used gold dimensional paint to outline parts of the tip and black dimensional paint to make the holes in the tip.


Because I had to cut many pieces of pipe foam to get the shapes right, the sword came out looking more rugged than polished, which actually worked out alright.  Also, because it was surrounded in pipe foam, the sword was nice and squishy, hehe.  Once we get some more pictures from our photographers, you will be able to see the full sword, and its size compared to my height.  Mimi helped out TREMENDOUSLY in the concept and creating of the sword.  I really couldn't have made this in time without her.

Thanks everyone, and we'll be sure post more often now that we have time and are not on vacation, hahaha. 

~Stuart~

Sunday, June 3, 2012

On vacation~ But will be back soon!

I think you guys have noticed that we haven't updated in a while, that's because we decided to take a trip to Orlando for a week right after Animazement.  We will be back in a couple of days for more updates!!!! :D


Related Posts Plugin for WordPress, Blogger...